
 Wanna try Mac OS X Mountain Lion, but don’t have an iMac or Mac Book Pro? Well today is your day as I have build a guide just for you to kick start VMware with Mac OS X Mountain Lion! Well, First of all we should thank souldevteam as they are the one who created a VMware image just for the VMware! Just so you know, this is a mac running on VMware so you might not get all the features and yes its definitely depends on your hardware that you have.
UPDATE 19/06/2016 : Updated the links since the old links are down!
VMware Compatibility:
Let’s see if your hardware is compatible or not. The important thing that you need in this is Hardware Virtualization Technology (VT). Make sure that your CPU has this option. Where to check this? Well if you have an intel i5 processor like mine then click here and at the bottom of the table, you can see whether “Intel® Virtualization Technology (VT-x)” is there or not. You can check out the entire list of processors that are VT enabled by clicking here. Alright so you have it? Then head over to your BIOS setup (Click Esc for HP Laptop or F9/DELETE button for other systems mostly), select Advanced Settings and you would see “Virtualization Technology” and Enable it.
Moving on, You need sufficient amount of RAM to power the virtual machine. I would recommend having 4 GB of RAM at least on your PC & assign at least 2 GB for the virtual machine. If you have 6GB of RAM like mine, then allocate 4 GB to the VM for a smooth performance! Have it? Good.
Procedure
Now, Download the VMware Workstation 9 Trial or Full version and install it like normal.
Next, You need to download a pre installed VMware image of Mountain Lion and two other tools. Download “OS X Mountain Lion 10.8.2 VMware Image” about 4.40 GB, “VMware Unlocker – Mac OS X Guest“. Well, depending upon your internet connection, it might take some minutes or hours. For an average 4 mbps connection, it would take approximately 2.5 hours.
The below step is to be taken if your CPU does not support Virtualization Technology:
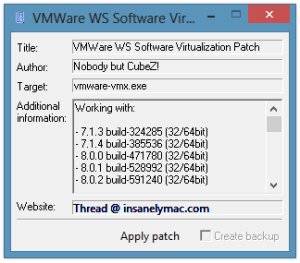
Extract everything and navigate to the folder “VMware Unlocker – Hardware Virtualization Bypasser” and open “vmware-vmx-patch.exe” file as an Administrator (Right click the file and select Run as administrator), click Apply Patch and select the place where you have installed VMware (If you don’t know where it is then probably by default it would be on “C:\Program Files (x86)\VMware\VMware Workstation” for 64 bit Windows OS and for 32 bit Windows OS, it would be at “C:\Program Files\VMwareVMware Workstation”.)
From my attention, after applying this patch on VMware Workstation 9, I have received some error like “0 out of 11 patterns replaced at least once. The patch will not work“. Well even when it says like that to you then just ignore it because the patch works fine and you could have the option to select Mac OS X on VMware. For VMware 8, 7 there wouldn’t show any errors like this and it will work fine. Make sure you apply this patch first before loading the Mac OS X Mountain Lion into VMware.
Done? Moving on to next step, Open “VMware Unlocker – Mac OS X Guest”, run the program “win-install.exe” as an administrator (Again, right click this file and click Run as administrator). By running this you will see some codes in the command prompt, Let it run until the command prompt get exits automatically. It would take only seconds.
Next Page
Pages: 1 2